Help:Assembly/3A Assembly
- Registry Help Pages:
- TOC
- At-a-Glance
- FAQ
Introduction
3A Assembly (which stands for three antibiotic assembly) is a method for assembling two part samples and selecting for correct assemblies through antibiotics. 3A assembly uses the restriction sites on the prefix and suffix to assemble part samples. This new composite part will maintain the same prefix and suffix as its "parents" and contain a scar, where the cut and re-ligated restriction sites were stitched together.
It uses effective antibiotic selection to eliminate unwanted background colonies and eliminates the need for gel purification and colony PCR of the resulting colonies. In theory, about 97% of the colonies should be the desired assembly. Additionally, the Registry has been providing iGEM teams and Registry labs with linearized plasmid backbones to further improve this assembly method.
Motivation
3A assembly was designed such that gel purification of the digested parts is unnecessary. The motivations for eliminating the gel purification step are as follows
- Gel purification tends to be inefficient especially on small pieces of DNA. It can be difficult to isolate small pieces of DNA (< 200 bp) from a gel. Thus, when assembling two small pieces of DNA, 3A assembly is more advantageous.
- Gel purification is slow and not easily susceptible to automation and scaling. It can be a limiting step in terms of how many assemblies can be done in parallel.
3A Assembly Advantages
- No PCR
- No gel purification
- Higher success rate compared to Standard Assembly.
Compatibility with Assembly Standards (RFCs)
The 3A Assembly method is compatible with the following assembly standards (RFCs)
BioBrick 10 BB-2 12 Silver 23 Freiburg 25
Description
Notes
- The following description uses BioBrick RFC[10] part samples as an example.
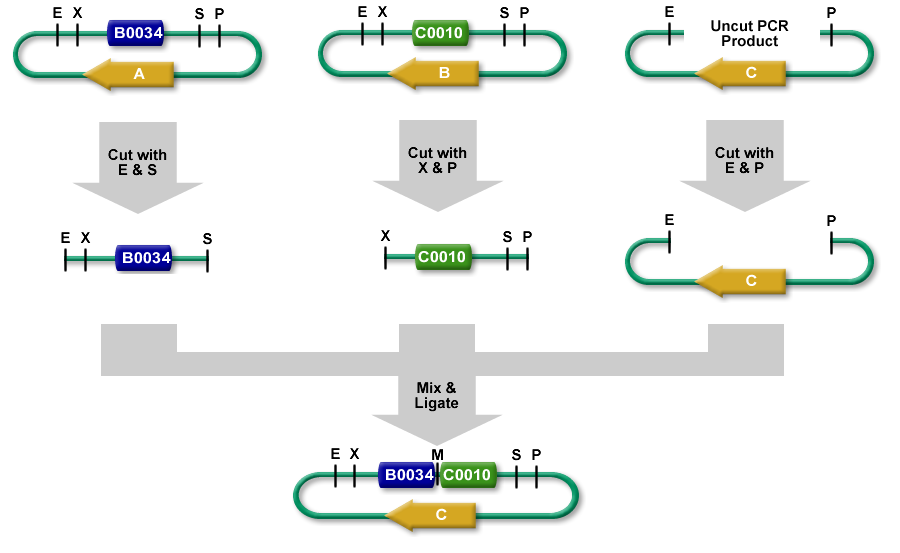
- The left part sample is in a plasmid backbone with an AB resistance for antibiotic A.
- The right part sample is in a plasmid backbone with an AB resistance for antibiotic B.
- A linearized plasmid backbone is selected with neither resistance A nor B. It has AB resistance C.
Method
- Restriction Digests
- The left part sample is cut out with EcoRI and SpeI.
- The right part sample is cut out with XbaI and PstI.
- The linearized plasmid backbone is a linear piece of DNA. It has a few bases beyond the EcoRI and PstI restriction sites. It is cut with EcoRI and PstI.
- All 3 restriction digests are heated to heat kill all of the restriction enzymes.
- An equimolar quantity of all 3 restriction digest products are combined in a ligation reaction.
- The desired result is the left part sample's SpeI overhang ligated with the right part sample's XbaI overhang resulting in a scar that cannot be cut with any of our enzymes.
- The new composite part sample is ligated into the construction plasmid backbone at the EcoRI and PstI sites.
- When the ligation is transformed into cells and grown on plates with antibiotic C, only colonies with the correct construction survive.
The Registry recommends using our 3A Assembly Protocol
Parts | Plasmid Backbones | BioBrick Prefix and Suffix | Standards | Assembly Standards | Assembly Methods

