Help:Protocols/3A Assembly
Revision as of 19:52, 2 June 2015 by Vinoo (Talk | contribs) (Created page with "{{HelpPage/MainCSS}} {{TOCright}} ==Before You Start!== You should read the overview of 3A Assembly if you are not familiar with its mechanics. The...")
Before You Start!
You should read the overview of 3A Assembly if you are not familiar with its mechanics. The protocol assumes that you have the part samples you will assemble ready in purified form (Miniprepped or PCR purified). The Protocol has has 4 stages: Restriction Digest, Ligation, Transformation, Picking Colonies.
Since you'll be assembling two part sample together, you will want to make sure you're putting them in the correct order. We will refer to the first part as Part A, and the second part Part B
Restriction Digest
Materials
- Your two part samples: Miniprepped DNA (in BioBrick RFC[10] plasmid backbones)
- Linearized plasmid backbone (with a different resistance to the plasmid backbones containing your part samples)
- EcoRI, XbaI, SpeI, PstI
- NEB Buffer 2
- BSA
- dH20
Procedure
Digest Reaction
- dH20
- NEB Buffer 2
- BSA
- DNA and Exzymes
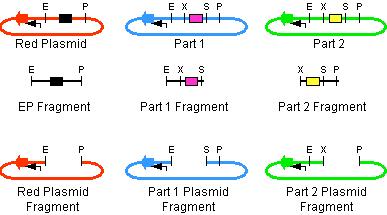
- Digest Part A with EcoRI and SpeI
- Digest Part B with XbaI and PstI
- Digest linearized plasmid backbone with EcoRI and PstI
- Optional: digesting with DpnI will eliminate any template plasmid DNA
- Combine 1 ul of each restriction digest reaction with 1 ul of ligase in a 25 ul reaction.
- Transform the ligation product. (See Chemical transformation or Electroporation.)
- If the input parts are good, almost all colonies will be correct.
- If desired analyze the transformation with single colony PCR followed by agarose gel electrophoresis.
- In rolling, large scale assembly, this step is often omitted.
- Miniprep clones that generated a band of the appropriate size.
- Sequence the clone.
- Record the sequence information in the Registry.
Notes
Obtaining materials
- All listed vectors are available to iGEM teams and Registry labs and courses through the Registry of Standard Biological Parts.
- As of spring 2010, we recommend using linear construction plasmid backbones that are available from the Registry or that you make yourself using PCR.
Troubleshooting
- In our experience, most problems with 3A Assembly come from the transformation process. Because 3A Assembly uses a triple ligation, the concentration of assembled DNA is about 10% of that produced by a double ligation process. Particularly, if your lab makes its own competent cells (and particularly chemically competent cells) it is important to test the competency. If you are having trouble obtaining colonies, we suggest that you try commercial competent cells. Be sure to follow the instructions carefully. Do not add more ligation product than specified and be careful when resuspending the competent cells.
- If you are interested in making your own competent cells, we suggest using the protocol that was developed by Tom Knight and used by the Registry.
- The second most common problems are caused by defects in the DNA entering the ligation. We find ligation to be a very reliable process. However, the sticky ends of the cut parts can be destroyed by enzymes. Also, the original DNA may be incorrect or defective.
- Another common mechanism for failure involves a piece of genomic DNA being cloned into the construction plasmid. This result typically occurs when the assembly is somehow unfavorable to the cell. This issue can be partially checked via the colony PCR step in the protocol though if the genomic DNA is of the same size as your assembly, then the single colony PCR screen is ineffective. A careful purification of the construction plasmid can help to avoid this result as can phosphatase treatment of the linear construction plasmid.
Analysis
- Since the transformed cells are plated on plates supplemented with the antibiotic corresponding to the construction plasmid, only cells containing the construction plasmid backbone should survive.
- Since the construction plasmid itself has been reduced in quantity by PCR and digestion by DamI, few colonies will contain the original construction plasmid.

