Help:IGEM 09 DNA distribution
Contents
iGEM 2009 Distribution
This year at iGEM we have made a few important changes to the Registry and the DNA Parts Kit distribution. We have returned to the 384 well format used in 2007, but have taken into consideration the extensive quality control measures used for the 2008 distribution. While we will not be sending out all of the parts in the Registry, we have produced a kit with a smaller number of confirmed quality controlled parts, (3) 384 well plates total, that will be a very effective basis for your synthetic biology projects.
Getting Started with the 2009 DNA Parts Kit
Storage
Store the DNA Parts Kit with the plastic lid and the adhesive foil cover in the -20C freezer.
Usage
The DNA Parts Kit is a tool available to you to perform synthetic biology with standard biological parts. It contains dry DNA of hundreds of parts that are available in the Registry up until 2009. You will transform the DNA into cells and make your own glycerol stocks of any part that you wish, however it does not contain enough DNA to do assembly. To use the DNA in the Parts Kit you may follow these instructions:
- With a pipette tip, puncture a hole through the foil cover into the corresponding well to the Biobrick™-standard part that you want. in_the_Distribution Make sure you have properly located your part.
- Add 15uL of diH2O (deionized water)
- Take 1uL DNA and [http://openwetware.org/wiki/Bacterial_Transformation transform] into your desired competent cells, plate bacteria with the appropriate antibiotic* and grow overnight.
- Pick a single colony and inoculate broth (again, with the correct antibiotic) and grow for 18 hours.
- Use the resulting culture to miniprep the DNA AND make your own glycerol stock (for further instruction on making a glycerol see [http://openwetware.org/wiki/Endy:Making_a_long_term_stock_of_bacteria this page]).
*To know which antibiotics to use, look at the plasmid that the part is in. The naming scheme for plasmids is specifically designed to indicate antibiotic resistance.
Locating a Part in the Distribution
Browsing through the "plates"
- Go to the Registry.
- Click on DNA Repositories in the toolbox.
- Click on Spring 2009 Source Plates.
- Here you will find a list of contents of the 96-well plates that comprise the 2009 Spring DNA Distribution. You can browse through these plates and take a look at all of the Quality Control information.
Locating a particular part
- Go to the Registry.
- In the search box on the upper right, enter the part number that you are interested in (e.g. BBa_B0015) and click GO.
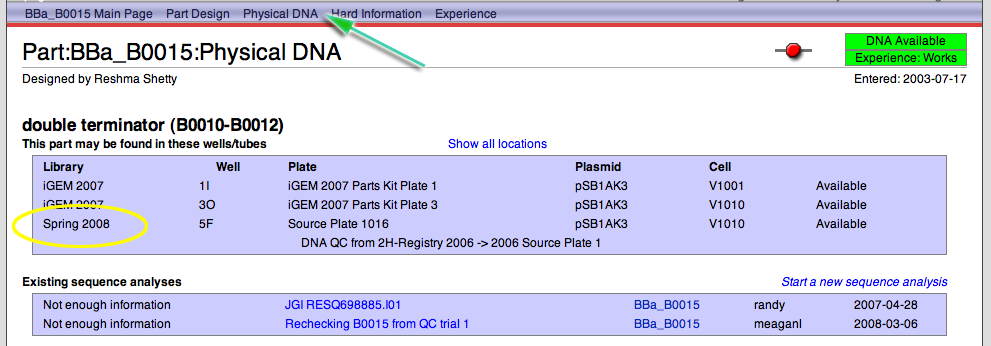
- In the part navigation bar at the top of the page, click on Physical DNA.
- You will see all of the locations for this part. You are looking for the location in the Spring 2009 Distribution Library
- Note that we only have physical DNA for parts whose part status (box in the upper right hand corner) reads Available
Distribution plate orientation
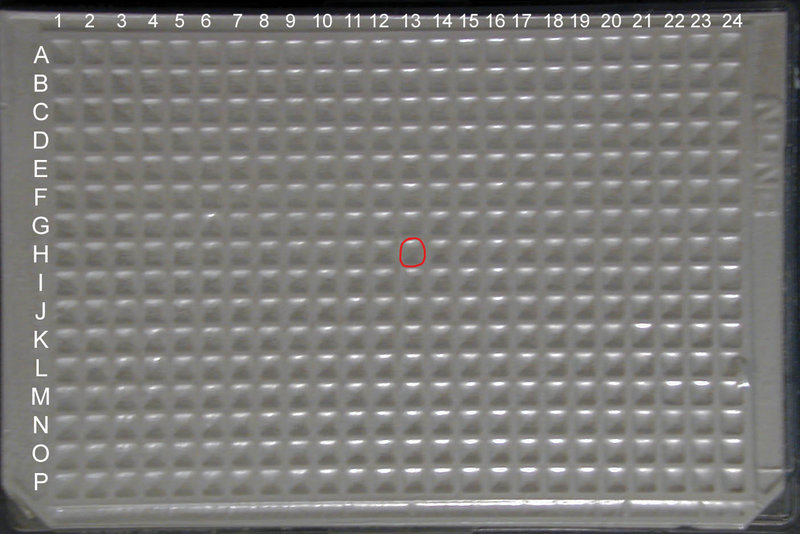
For the iGEM 2009 distribution, you will receive a set of of 3 Nunc 384-well plates, from which you can extract the part of your choice once you have located it through the Registry repository for iGEM 2009. Unfortunately the foil cover will obscure both column and well markings. However, you can still find your part by correctly orienting the plate using the two notched corners as markers: well A1 is located at the upper left corner of the plate when the long side of the plate with the notched corners is considered the bottom.
Once you have found the well which your BioBrick™ part of choice is located in in by searching for it through the Registry (for example well 13H in iGEM2007 DNA Parts Kit Plate 1) you want to count across the plate starting with Column 1 until you get to Column 13 and down the plate starting with Row A until you get to Row H.
MAKE SURE that the two notched corners of the plate are oriented at the BOTTOM of the plate (see the top view image at left for correct orientation)


