Difference between revisions of "Help:Editing Experience"
(→The Experience Wiki Code) |
|||
| Line 40: | Line 40: | ||
| − | [[Image:T1000 experience 3.png]] | + | [[Image:T1000 experience 3.png|frame]] |
| Line 49: | Line 49: | ||
* The actual user review that is displayed, if any. In this example, there are no displayed reviews | * The actual user review that is displayed, if any. In this example, there are no displayed reviews | ||
* The ending "partinfo" tag that delimits the end of the user review section | * The ending "partinfo" tag that delimits the end of the user review section | ||
| − | |||
== Adding Experience Information == | == Adding Experience Information == | ||
Revision as of 23:09, 21 June 2006
Contents
Background Information
As of June, 2006, the Registry has been integrated with a wiki. This allows users to more easily annotate parts they create or the parts they use. This page describes how to do the latter, ie. to add user experience information to a part that already exists in the registry.
Finding the Experience Section
The BioBrick part T1000 is a nonsense part created by Randy Rettberg that we will use for example purposes (see screenshot left). The editing process is identical for any other BioBrick, however.
To see user experience information entered on this part, one would need to click the Experience link in the pink navigation box on the left hand side of the screen.
If no user experience has been reported, one would expect to see a page similar to the screenshot above. (Don't worry if there is experience already added. The steps are still the same to add more.) To add experience, click on the Edit button, circled in red.
The Experience Wiki Code
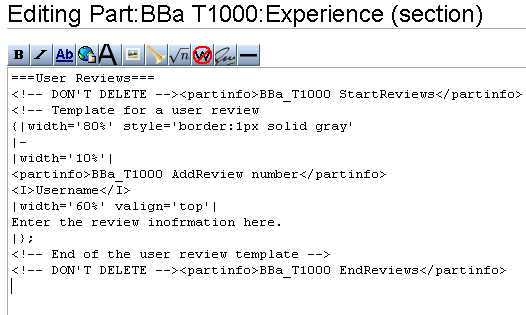
An edit window with wiki code will appear. At first glance, the code seems very complex, but it is actually very straightforward. There are four parts to the this code:
- The starting "partinfo" tag that begins counting and displaying reviews
- A commented out piece of example code, a template for a new user review
- The actual user review that is displayed, if any. In this example, there are no displayed reviews
- The ending "partinfo" tag that delimits the end of the user review section
Adding Experience Information
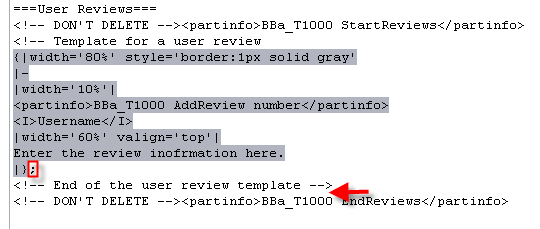
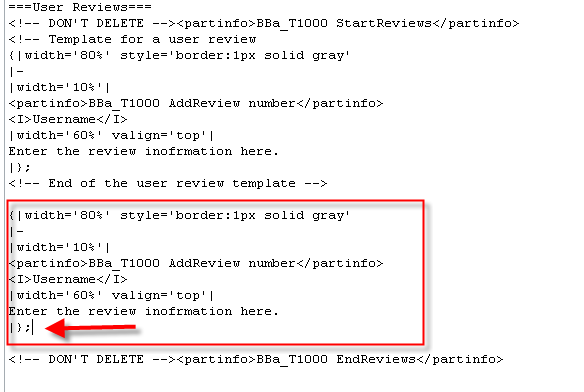
First, select and copy the text of the User Review template (see above). Then paste the text below the line that says --End of the user review template --> as in the picture below. Note: You will have to remove the trailing semi colon (red arrow) if you selected and pasted this with the template.
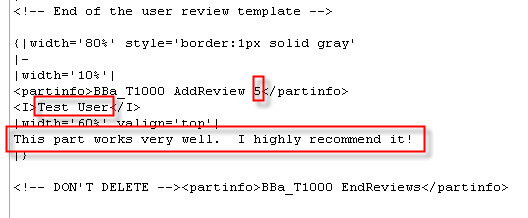
Now, change the text of the template to include your experience information. Assign the part a rating score from 0 to 5, put in your username, and write your comments.
When you are finished, you can preview your results. You should see something like this on the Experience page:
If everything looks good, then save the wiki page. Congratulations! You have just finished adding your experience to a BioBrick part.
Other Notes
- If experience has already been entered for a part, always place yours at the TOP of the list, again just under the lhe line that says --End of the user review template -->. This will put the most recent user experience first in the display.
- Don't forget to remove that semi-colon if you pasted it with the template.
- The partinfo tag summarizes all the scores of the part. This will be used later to help designers choose the best parts.


