Assembly:3 Antibiotic Assembly
Introduction
3A assembly (which stands for three antibiotic assembly) is a method for assembling two BioBrick parts together. It differs from the more common assembly approach and the Silver lab approach in that it relies on three way ligation (between the two parts and the backbone vector) for assembly rather than two way ligation between a part and a part + vector molecule. It uses both positive and negative selection to reduce/eliminate the number of incorrect assemblies that give rise to colonies after transformation.
Motivation
3A assembly was designed such that gel purification of the digested parts is unnecessary. Incorrect assemblies are selected against via either positive or negative selection. The motivations for eliminating the gel purification step are as follows
- Gel purification is slow and not easily susceptible to automation and scaling. As the registry moves to larger scale assembly of parts, gel purification can be a limiting step in terms of how many assemblies can be done in parallel.
- Gel purification tends to be inefficient especially on small pieces of DNA. It can be difficult to isolate small pieces of DNA (< 200 bp) from a gel. Thus, when assembling two small pieces of DNA, 3A assembly might prove advantageous.
The primary disadvantage of 3A assembly is that currently the vectors necessary for doing 3A assembly are only available at high copy. (For 3A assembly, three vectors with different antibiotic resistances are needed.) Thus, if your assembly generates a construct that places a large burden on the cell at high copy, it may be difficult to assemble using this technique until new vectors are available.
Description
Schematic
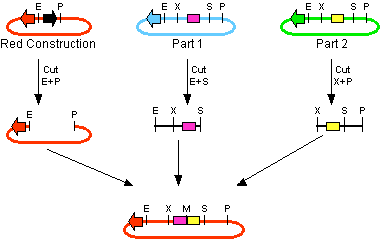
- The red plasmid is the construction vector.
- It contains ccdB as indicated by the black block arrow. Its red color is to indicate that it has a different antibiotic resistance marker from each of two parts (blue and green).
- Strictly speaking, it need only contain the EcoRI and PstI restriction sites as indicated, not the full BioBricks prefix and suffix; however, for convenience, all construction plasmids built to date have the full BioBricks prefix and suffix.
- The blue plasmid contains part 1 or the prefix part.
- The green plasmid contains part 2 or the suffix part.
- Note that the suffix part can have the same or different antibiotic resistance marker from the prefix part. Hence the possibility to have 2 or 3 different antibiotic resistance markers.
Overview
The construction plasmid is cut with EcoRI (E) and PstI (P). The prefix part is cut with EcoRI (E) and SpeI (S). The suffix part is cut with XbaI (X) and PstI (P). The resulting linearized DNA pieces are then ligated together and transformed. The transformed cells are plated on plates supplemented with the antibiotic corresponding to the red plasmid.
Analysis
- Since the transformed cells are plated on plates supplemented with the antibiotic corresponding to the construction plasmid, only cells containing the red (construction) plasmid backbone should survive.
- Since the construction plasmid contains ccdB, cells which are transformed with just the intact construction plasmid should be killed by the lethal ccdB gene.
Materials
- Two parts in BioBricks format to be assembled. Either the parts are in a plasmid or they can be generated via PCR.
- A construction vector with a different resistance marker from either of your two parts. Since these construction vectors carry the lethal ccdB gene, they must be propagated in a strain resistant to ccdB like DB3.1.
Procedure
- Miniprep your two parts and construction plasmid.
- Digest your two parts and destination vector with the following enzymes
- Prefix part with EcoRI and SpeI
- Suffix part with XbaI and PstI
- Construction vector with EcoRI and PstI
- Purify the restriction digest.
- For parts < 200 bp in length, do a Knight:Micropure EZ and Microcon purification (or alternatively an Ethanol precipitation of small DNA fragments). All other parts and the construction vector can be purified using a [http://www1.qiagen.com/HB/QIAquickSpin QIAquick PCR purification kit] or [http://www1.qiagen.com/literature/handbooks/PDF/DNACleanupAndConcentration/MinElute/1027886_HB_QQ_MinElute_0604.pdf| Qiagen Minelute PCR Purification Kit] (elutes in a smaller volume giving greater concentration of the DNA).
- Ligate the two parts and construction vector together. (Endy lab protocol)
- Transform the ligation product. (See also Electroporation or another chemical transformation.)
- Analyze the transformation with single colony PCR followed by agarose gel electrophoresis.
- In rolling, large scale assembly, this step is omitted.
- Miniprep clones that generated a band of the appropriate size.
- Sequence the clone.
Notes
Obtaining materials
- All listed vectors are available through the [http://Registry Registry of Standard Biological Parts].
Troubleshooting
- If the transformation rate is too high, then the possibility arise that a clone will contain two plasmids: the correct assembled plasmid and one of the parent "part" plasmids. Therefore, it may be necessary to screen the transformed clones for resistance to the parent antibiotic resistance markers. In most assemblies done with this method to date, this does not occur however it has been seen occasionally.
- Another common mechanism for failure involves a piece of genomic DNA being cloned into the construction plasmid. This result typically occurs when the assembly is somehow unfavorable to the cell. This issue can be partially checked via the colony PCR step in the protocol though if the genomic DNA is of the same size as your assembly, then the single colony PCR screen is ineffective. A careful purification of the construction plasmid can help to avoid this result as can phosphatase treatment of the linear construction plasmid.
- 3A assembly has been done using the protocols linked above. However, in all likelihood, the above protocols can be replaced with your lab's version and the whole process should work just fine.
- In debugging the use of 3A assembly by folks in other labs, a common difference between other folks and myself seems to be the amount of DNA used in ligation reactions. Typically, I digest either 500ng DNA of both parts and the destination vector. Each digestions takes place in a volume of 50μL. This digest is then purified via either Microcon centrifugal filtration (for parts < 200bp) or Qiagen minelute PCR purification (for parts > 200bp) into a volume of 20μL or 10μL respectively. The ligation mixture generally has 2μL of destination vector and ~3μL of each part. (Depending on the relative sizes of the parts, I may use a greater volume of one or the other and adjust the volume of the other accordingly.) These DNA amounts and concentrations tend to be larger than "normal" ligations. I think higher DNA concentrations favor three way ligations.
References
- This page is intended as a replacement for the [http://biobricks.ai.mit.edu/Assembly/Assy_3A.htm original static webpage] describing 3A assembly. This page contains a more systematic analysis of the incorrect ligation products that may result from this assembly process.
Contact
This assembly technique was formulated by Randy Rettberg and implemented by Reshma Shetty.


